
Introduction
Collecting payments is one of those features that shows up in almost every serious Meteor app. Whether you are building a SaaS product, a membership platform, or an e-commerce store, at some point you need to charge your users.
Stripe is the most widely used payment platform for web applications, but most Stripe tutorials are written for a general audience. They do not cover how to initialize Stripe safely inside a Meteor app, how to handle payment logic inside a Meteor method, or how to store payment records in MongoDB the Meteor way.
This guide fills that gap. By the end, you will have a working Stripe integration built specifically around how Meteor works.
Who This Is For
This guide is for Meteor developers who want to add Stripe payments to a new or existing Meteor 3.x app. You should be comfortable with Meteor basics including functions, Methods, collections, and React but you do not need any prior experience with Stripe. Every step is covered from scratch.
What You Will Build
By the end of this guide, you will have a working Meteor app that does the following:
1. Collects card payments using Stripe Elements
2. Creates Payment Intents server-side using a Meteor Method
3. Saves payment records to MongoDB
4. Handles webhooks so your database stays in sync even when the browser redirect fails
5. Deploys to Galaxy with your Stripe keys stored securely
Prerequisites
Before you get started, you will need a few things set up:
- Meteor CLI installed — verify with `meteor –version`. If you do not have it yet, follow the [official Meteor installation guide](https://docs.meteor.com/about/install.html) before continuing.
- A Stripe account — sign up at [stripe.com](https://stripe.com). Test mode keys work for everything in this guide. When you are ready to go live, swap them for your live keys in your settings.
- Basic familiarity with React and Meteor Methods — you do not need to be an expert, but you should be comfortable with both before following along.
Setting Up Stripe
1. Create a Meteor App
Start by scaffolding a new Meteor project with React:
meteor create meteor-stripe-demo

cd meteor-stripe-demoWhen the command completes, you will see:
Using react skeleton

Created a new Meteor app in 'meteor-stripe-demo'.If you already have a Meteor app, skip to step 2.
2. Install Stripe Packages
You need three packages: the server-side Stripe SDK, the client-side Stripe loader, and the React components for Stripe Elements:
meteor npm install --save stripe @stripe/stripe-js @stripe/react-stripe-js– stripe — the server-side SDK for creating Payment Intents
– @stripe/stripe-js — loads Stripe securely on the client
– @stripe/react-stripe-js — React components for building the checkout form
3. Store Your API Keys with Meteor.settings
Never hardcode API keys in your source code. Meteor has a built-in way to handle this called Meteor.settings. Create a settings.json file at the root of your project:
touch settings.jsonAdd your Stripe keys to it:
{
  "public": {
    "stripe_publishable_key": "pk_test_your_publishable_key_here"
  },

  "private": {
    "stripe_secret_key": "sk_test_your_secret_key_here"
  }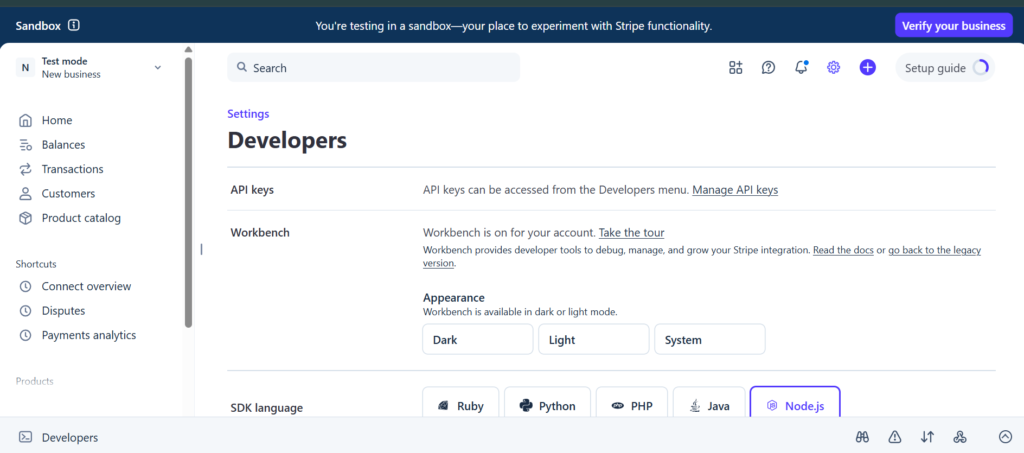
}You can find your keys in the Stripe dashboard under Developers > API Keys. Make sure you are in Test mode before copying your keys. You will see “Test mode” indicated in the top left of your dashboard.
Navigate to Settings > Developers > API Keys and click Manage API keys.
You will see two sections: Restricted keys and Standard keys. For this guide you only need the keys under Standard keys, which are the publishable key that starts with pk_test_ and the secret key that starts with sk_test_.
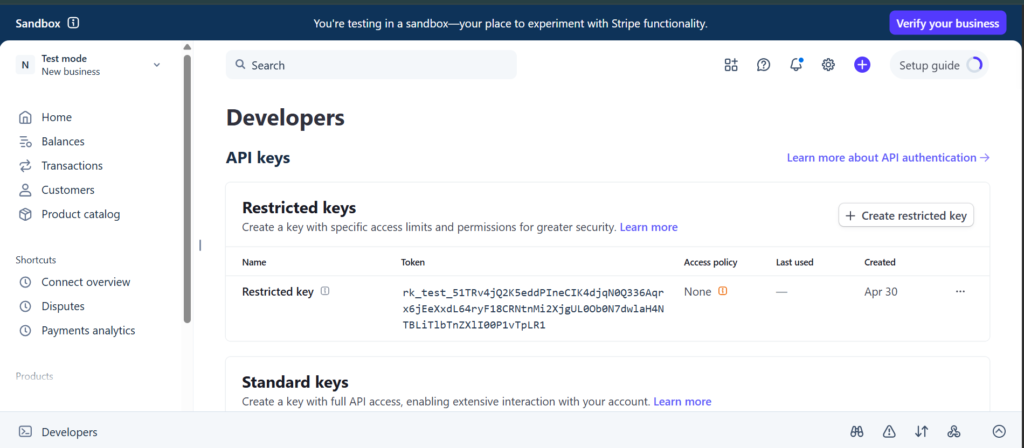
The public section is safe to send to the client. The `private` section is server-only and never reaches the browser.
4. Add settings.json to .gitignore
Add settings.json to your .gitignore so you never accidentally commit your keys:
echo "settings.json" >> .gitignore5. Update the start script
Update the start script in your package.json so you never forget to include the settings file when running the app:
"scripts": {
  "start": "meteor run --settings settings.json"
}From now on, start your app with meteor npm start.
Note: The default Meteor React scaffold includes some demo files you will not need for this guide. You can safely delete them:
rm imports/ui/Counter.jsx imports/ui/Header.jsx imports/ui/Info.jsx imports/ui/meteor-logo.svgCreating a Payment Intent (Server Side)
When a customer pays on your app, two things need to happen. Your server needs to tell Stripe “I want to charge this person” and your client(browser) needs to collect their card details and confirm the payment. The Payment Intent is what connects those two steps.
Here is the flow:
1. Your server creates a Payment Intent and gets back a `client_secret`
2. The `client_secret` is sent to the client
3. The client uses it along with the card details to confirm the payment with Stripe
The reason this happens on the server first is simple. Your Stripe secret key never leaves the server. The client only ever sees the `client_secret`, which is safe to expose because it can only be used to confirm that specific payment and nothing else.
Defining Pricing
Create a simple pricing configuration inside imports/api/pricing.js
export const PRICING = {

  default:
    amount: 5000,
    currency: 'usd',
    label: '$50.00',
  },
};This acts as the single source of truth for all payment amounts in the system.
Saving Payment Records
Before handling payments, the application needs a place to store transaction data. This allows each payment attempt to be tracked and updated as its status changes over time.
Create a new file at imports/api/payments.js to define the MongoDB collection for storing payments.
import { Mongo } from 'meteor/mongo';

export const Payments = new Mongo.Collection('payments');This collection stores each payment attempt and tracks its status as it moves from pending to succeeded.
Implementing the Server Payment Logic
Open server/main.js and replace its contents with the following:
import { Meteor } from 'meteor/meteor';
import Stripe from 'stripe';
import { Payments } from '../imports/api/payments.js';
import { PRICING } from '../imports/api/pricing.js';

let stripe;

Meteor.startup(() => {
  stripe = new Stripe(Meteor.settings.private.stripe_secret_key);
  console.log('Stripe initialized');
});

Meteor.methods({

  async 'payments.createIntent'() {

    const { amount, currency } = PRICING.default;
    const paymentIntent = await stripe.paymentIntents.create({
      amount,
      currency,
    });

    await Payments.insertAsync({
      paymentIntentId: paymentIntent.id,
      amount,
      currency,
      status: 'pending',
      createdAt: new Date(),
    });

    return paymentIntent.client_secret;
  },
});Each time a payment is initiated, the server creates a Stripe Payment Intent and stores a corresponding record in MongoDB after successful creation.
The client only receives the client_secret, which is used on the frontend to confirm the payment securely with Stripe. This value does not expose any sensitive server-side credentials and is only valid for that specific payment intent.
Building the Checkout UI (Client Side)
1. Build the Checkout Form
Create a new file at imports/ui/CheckoutForm.jsx:
import React, { useState } from 'react';
import { PaymentElement, useStripe, useElements } from '@stripe/react-stripe-js';
import { Meteor } from 'meteor/meteor';
import { PRICING } from '../api/pricing.js';

export const CheckoutForm = () => {
  const stripe = useStripe();
  const elements = useElements();
  const [errorMessage, setErrorMessage] = useState(null);
  const [loading, setLoading] = useState(false);

  // UI-only pricing (presentation layer only)
  const { label } = PRICING.default;

  const handleSubmit = async (event) => {
    event.preventDefault();
    if (!stripe || !elements) return;

    setLoading(true);
    setErrorMessage(null);

    try {
      // Ensures Stripe validates form state before any server call
      const { error: submitError } = await elements.submit();
      if (submitError) {
        setErrorMessage(submitError.message);
        setLoading(false);
        return;
      }

      // Server is the source of truth for PaymentIntent creation
      const clientSecret = await Meteor.callAsync('payments.createIntent');

      const { error } = await stripe.confirmPayment({
        elements,
        clientSecret,
        confirmParams: {
          return_url: `${window.location.origin}/payment-success`,
        },
      });

      if (error) {
        setErrorMessage(error.message);
      }
    } catch (err) {
      setErrorMessage(err.message);
    } finally {
      setLoading(false);
    }
  };

  return (
    <form onSubmit={handleSubmit}>
      <PaymentElement />
      <button
        type="submit"
        disabled={!stripe || loading}
        style={{
          marginTop: '16px',
          width: '100%',
          padding: '12px',
          backgroundColor: '#635bff',
          color: 'white',
          border: 'none',
          borderRadius: '6px',
          fontSize: '16px',
          fontWeight: 'bold',
          cursor: loading ? 'not-allowed' : 'pointer',
          opacity: (!stripe || loading) ? 0.7 : 1,
        }}
      >
        {loading ? 'Processing...' : `Pay ${label}`}
      </button>
      {errorMessage && (
        <div style={{ color: 'red', marginTop: '12px' }}>
          {errorMessage}
        </div>
      )}
    </form>
  );
};elements.submit() must be called before any async work including your Meteor Method call. Stripe requires this to validate the payment form before you make any server requests. Skipping it will result in an error.
2. Install react-router-dom
Install `react-router-dom` for routing between the checkout and success pages:
meteor npm install react-router-dom3. Wire it all together in App.jsx
Replace the contents of imports/ui/App.jsx with the following:
import React from 'react';
import { BrowserRouter as Router, Routes, Route } from 'react-router-dom';
import { loadStripe } from '@stripe/stripe-js';
import { Elements } from '@stripe/react-stripe-js';
import { Meteor } from 'meteor/meteor';
import { CheckoutForm } from './CheckoutForm';
import { PaymentSuccess } from './PaymentSuccess';
import { PRICING } from '../api/pricing.js';
const stripePromise = loadStripe(Meteor.settings.public.stripe_publishable_key);
/**
* Frontend pricing is ONLY for display + Stripe UI initialization.
* It is not used for charging logic.
*/
const { amount, currency, label } = PRICING.default;
const options = {
mode: 'payment',
amount,
currency,
};
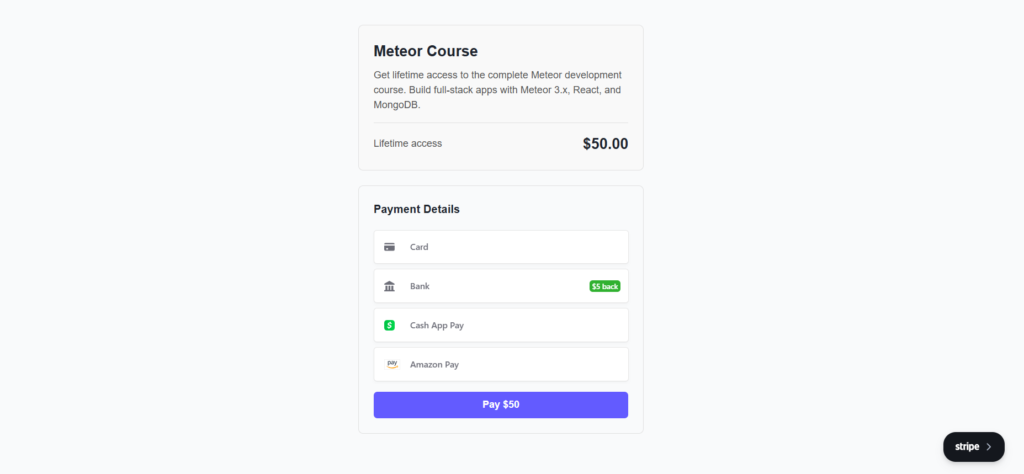
const CheckoutPage = () => (
<div style={{ maxWidth: '500px', margin: '50px auto', padding: '20px', fontFamily: 'sans-serif' }}>
<div style={{ border: '1px solid #e0e0e0', borderRadius: '8px', padding: '24px', marginBottom: '24px', background: '#f9f9f9' }}>
<h1 style={{ margin: '0 0 8px 0', fontSize: '24px' }}>
Meteor Course
</h1>
<p style={{ margin: '0 0 16px 0', color: '#555' }}>
Get lifetime access to the complete Meteor development course. Build full-stack apps with Meteor 3.x, React, and MongoDB.
</p>
<div style={{ display: 'flex', justifyContent: 'space-between', alignItems: 'center', borderTop: '1px solid #e0e0e0', paddingTop: '16px' }}>
<span style={{ color: '#555' }}>Lifetime access</span>
<span style={{ fontSize: '24px', fontWeight: 'bold' }}>
{label}
</span>
</div>
</div>
<div style={{ border: '1px solid #e0e0e0', borderRadius: '8px', padding: '24px' }}>
<h2 style={{ margin: '0 0 20px 0', fontSize: '18px' }}>
Payment Details
</h2>
<Elements stripe={stripePromise} options={options}>
<CheckoutForm />
</Elements>
</div>
</div>
);
export const App = () => (
<Router>
<Routes>
<Route path="/" element={<CheckoutPage />} />
<Route path="/payment-success" element={<PaymentSuccess />} />
</Routes>
</Router>
);stripePromise is defined outside the component so it is only initialized once. If it is created inside the component, it will be reinitialized on every render, which can lead to unnecessary re-renders and unstable Stripe context behavior.
By default, Stripe’s Payment Element renders all payment methods that are available for your Stripe account configuration. This can include card payments and other supported methods depending on your region and enabled settings in the Stripe dashboard.
The exact payment options displayed are dynamically determined by Stripe based on factors such as your account configuration, customer location, and currency.
If you want to restrict available payment methods, this is typically configured on the server when creating the Payment Intent using Stripe’s payment method configuration settings or automatic payment methods, rather than relying only on the frontend options object.
Confirming the Payment
Create imports/ui/PaymentSuccess.jsx:
import React, { useEffect, useState } from 'react';
import { Meteor } from 'meteor/meteor';

export const PaymentSuccess = () => {
  const [status, setStatus] = useState('processing');

  useEffect(() => {
    const params = new URLSearchParams(window.location.search);
    const paymentIntentId = params.get('payment_intent');

    if (!paymentIntentId) {
      setStatus('error');
      return;
    }

    // Fire-and-forget status update (UI sync only)
    Meteor.callAsync('payments.updateStatus', paymentIntentId, 'succeeded')
      .then(() => {
        setStatus('success');
      })
      .catch(() => {
        // Even if this fails, webhook will still correct state
        setStatus('success');
      });
  }, []);

  return (
    <div style={{
      maxWidth: '500px',
      margin: '50px auto',
      padding: '20px',
      textAlign: 'center',
      fontFamily: 'sans-serif'
    }}>
      {status === 'processing' && (
        <>
          <h1>Finalizing your payment...</h1>
          <p>Please wait while we confirm your transaction.</p>
        </>
      )}
      {status === 'success' && (
        <>
          <h1>Payment Successful 🎉</h1>
          <p>Your transaction has been recorded successfully.</p>
          <a href="/">Return to dashboard</a>
        </>
      )}
      {status === 'error' && (
        <>
          <h1>Something went wrong</h1>
          <p>We couldn't verify your payment session.</p>
          <a href="/">Try again</a>
        </>
      )}
    </div>
  );
};When Stripe redirects to your return_url after a successful payment, it may include a payment_intent query parameter (e.g. `?payment_intent=pi_xxx`). The success page can read this value and use it to trigger a client-side confirmation request to the server.
However, this step is primarily for user experience and immediate UI feedback. The actual and authoritative update of the payment record in MongoDB is handled independently through Stripe webhooks, which ensure the payment status is correctly recorded even if the redirect does not complete.
Testing the Payment Flow End-to-End
At this stage, the full payment pipeline is in place. The system is now ready for functional validation, where we confirm that Stripe, Meteor, and MongoDB are working together as expected.
When you run the application locally using meteor npm start, Meteor automatically spins up a local MongoDB instance alongside your server. This makes it possible to immediately observe how payment data is being stored without any external database configuration.
1. Start the application
Now that all the code is in place, start your app:
meteor npm startOpen http://localhost:3000 in your browser. You should see the checkout form with the payment options.
2. Run a Test Payment
Test the full payment flow using Stripe’s test card details:
| Field | Value |
| Card number | 4242 4242 4242 4242 |
| Expiry | Any future date |
| CVC | Any 3 digits |
Note: ZIP code is optional in both test and production. However, for US-based businesses, collecting it is recommended as it enables an extra layer of fraud protection through AVS (Address Verification System) checking.
After clicking Pay, you should be redirected to the success page:

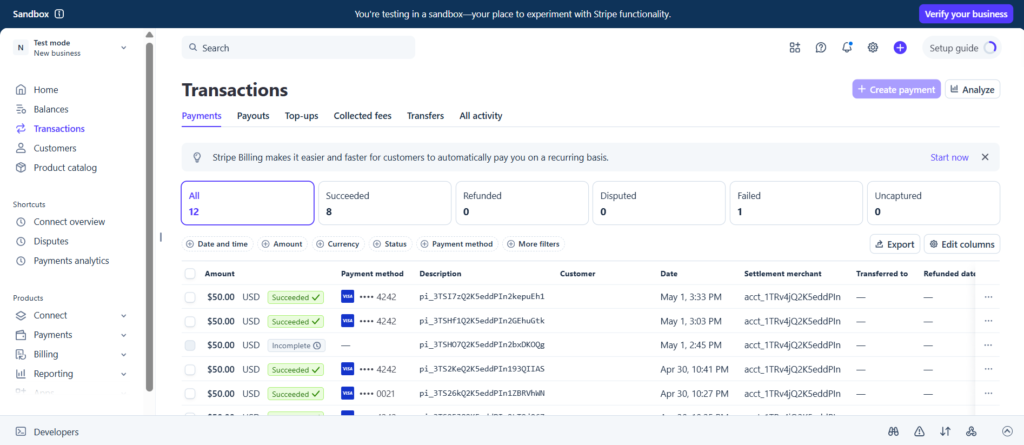
After completing the payment, Stripe will process the transaction and your application will update the payment status in MongoDB accordingly. You can observe the workflow through your server logs and database state changes.
You can also confirm the transaction directly in your Stripe Dashboard under Transactions > Payments.
Handling Webhooks
The success page approach works well for immediate user feedback, but it introduces a dependency on the browser completing a redirect after payment.
In real-world environments, that assumption is unreliable. Users may close the tab, lose connectivity, or interrupt navigation before the redirect completes. In such cases, Stripe still processes the payment successfully, but your application state remains outdated.
Webhooks solve this problem by removing the browser entirely from the critical path.
Instead of relying on the client, Stripe sends a direct server-to-server HTTP request whenever a payment event occurs. This ensures your backend is always aware of the final payment state, regardless of user behavior.
1. Install the Stripe CLI
The Stripe CLI lets you forward webhook events to your local server during development. You will need to run it in a separate terminal while your Meteor app is running, so keep your existing terminal with meteor npm start open and open a new one for the CLI commands.
Installation depends on your operating system.
macOS:
brew install stripe/stripe-cli/stripeUbuntu/WSL:
curl -s https://packages.stripe.dev/api/security/keypair/stripe-cli-gpg/public | gpg --dearmor | sudo tee /usr/share/keyrings/stripe.gpg > /dev/null

echo "deb [signed-by=/usr/share/keyrings/stripe.gpg] https://packages.stripe.dev/stripe-cli-debian-local stable main" | sudo tee -a /etc/apt/sources.list.d/stripe.list

sudo apt update && sudo apt install stripeWindows:
Download the latest installer from the Stripe CLI releases page.
Verify the installation:
stripe --version2. Log in to Stripe
Log in to connect the CLI to your Stripe account:
stripe loginThis will display a pairing code and a URL to visit in your browser to authenticate. Once authenticated you will see:
Done! The Stripe CLI is configured for your account with account id acct_xxx3. Start the Webhook Listener
In your new terminal, run:
stripe listen --forward-to localhost:3000/api/webhooksYou will see output like this:
Ready! You are using Stripe API Version [2026-04-22].

Your webhook signing secret is whsec_xxxxxx (^C to quit)Copy the whsec_ value and add it to your settings.json as stripe_webhook_secret:
{
  "public": {
    "stripe_publishable_key": "pk_test_xxx"
  },

  "private": {
    "stripe_secret_key": "sk_test_xxx",
    "stripe_webhook_secret": "whsec_your_webhook_secret_here"
  }
}4. Add the Webhook Endpoint
Update your existing server/main.js. Add WebApp to the imports at the top:
import { WebApp } from 'meteor/webapp';Then add the webhook handler at the bottom of the file, after your `Meteor.methods` block:
WebApp.connectHandlers.use('/api/webhooks', async (req, res) => {
  const sig = req.headers['stripe-signature'];
  const webhookSecret = Meteor.settings.private.stripe_webhook_secret;

  let rawBody = '';
  req.on('data', chunk => { rawBody += chunk; });

  req.on('end', async () => {
    let event;
    try {
      event = stripe.webhooks.constructEvent(rawBody, sig, webhookSecret);
    } catch (err) {
      console.log('Webhook signature verification failed:', err.message);
      res.writeHead(400);
      res.end();
      return;
    }

    if (event.type === 'payment_intent.succeeded') {
      const paymentIntent = event.data.object;
      await Payments.updateAsync(
        { paymentIntentId: paymentIntent.id },
        { $set: { status: 'succeeded', updatedAt: new Date() } }
      );
      console.log('Webhook: Payment succeeded:', paymentIntent.id);
    }

    res.writeHead(200);
    res.end();
  });
});stripe.webhooks.constructEvent() verifies that the request actually came from Stripe using the signing secret. Never skip this step. This protects the endpoint from unauthorized or spoofed requests and ensures only valid Stripe events are processed.
When you test a payment now, you will see two updates in your Meteor terminal, one from the webhook and one from the success page redirect:
Webhook: Payment succeeded: pi_xxx

Payment pi_xxx updated to succeededIn production, this dual-update pattern is safe because updates to the same payment record are idempotent and do not introduce side effects.
Deploying to Galaxy
1. Choose Your MongoDB Database
Before deploying, you will need a MongoDB database. You have two options.
Option 1: Galaxy’s free MongoDB (easiest)
Galaxy automatically provisions a free shared MongoDB database when you deploy with the `–free –mongo` flags. This is the quickest option and is suitable for learning and prototyping. The free database is limited to 500MB. This is not recommended for production apps.
Option 2: Bring your own MongoDB (paid plans)
For production apps, Galaxy offers managed MongoDB plans with daily backups available directly from your Galaxy dashboard. You can also use any external provider like MongoDB Atlas.
If you go this route, add your connection string to settings.json:
{
  "public": {
    "stripe_publishable_key": "pk_test_your_publishable_key"
  },

  "private": {
    "stripe_secret_key": "sk_test_your_secret_key",
    "stripe_webhook_secret": "whsec_your_webhook_secret"
  },

  "galaxy.meteor.com": {
    "env": {
      "MONGO_URL": "mongodb+srv://username:[email protected]/meteor",
      "ROOT_URL": "https://your-app-name.meteorapp.com"
    }
  }
}
2. Log in to Your Meteor Account
Log in from any terminal. You do not need to be inside your project folder for this.
Note: Galaxy requires a valid payment method on file for identity verification before your first deployment, even on the free plan. Your card will not be charged. Galaxy places a small temporary hold to verify it, which is automatically refunded.
meteor loginEnter your Meteor account credentials when prompted. Once logged in you will see:
Logged in as yourusername. Thanks for being a Meteor developer!3. Deploy to Galaxy
Navigate to your project folder and deploy:
cd meteor-stripe-demoIf you are on the free plan:
meteor deploy your-app-name.meteorapp.com --settings settings.json --free --mongoIf you are on a paid plan:
meteor deploy your-app-name.meteorapp.com --settings settings.jsonThe --free flag tells Galaxy to use the free plan. The --mongo flag is only needed alongside --free because Galaxy provisions a shared MongoDB for you automatically on the free plan. On a paid plan, neither flag is needed your MONGO_URL in settings.json handles the database connection.
Meteor will build your app and upload it to Galaxy. Once it completes, go to galaxycloud.app, open your app from the dashboard and confirm the status shows as Running.
4. Set Up Webhooks in Production
The Stripe CLI webhook listener only works locally. For production, register your webhook endpoint in the Stripe dashboard:
- Go to Stripe dashboard > Developers > Webhooks > Add endpoint
- Enter your production webhook URL:
https://your-app-name.meteorapp.com/api/webhooks - Select the
payment_intent.succeededevent and save - Copy the new signing secret Stripe gives you and update `stripe_webhook_secret` in your production settings
Conclusion
You now have a complete Meteor and Stripe integration. Payments are collected through Stripe Elements, processed server-side through a Meteor Method, recorded in MongoDB, and kept in sync through webhooks, all deployed to Galaxy.
A few things to keep in mind as you move forward.
Switch to live keys before going live. Everything in this guide uses Stripe test mode keys. When you are ready to accept real payments, replace your pk_test_ and sk_test_ keys with your live keys from the Stripe dashboard.
Stripe Subscriptions. If your app needs recurring billing, such as monthly or yearly plans, Stripe Subscriptions is the natural next step. The pattern is similar to what you have built here, but with additional webhook events for renewal, cancellation, and failed payments.
Secure your webhook endpoint. The signature verification in this guide is the right approach. In production, make sure your stripe_webhook_secret in settings.json matches the signing secret for your registered production endpoint, not the local CLI secret.