Introduction
Deploying a Meteor app manually is fine when you’re just getting started. You run meteor deploy, watch the logs, and move on. But as your app grows, manual deployments become a liability. One missed environment variable, one deployment at the wrong time, or one forgotten step can take down your production app.
A CI/CD pipeline solves these issues by making deployments automatic, repeatable, and auditable. Every push to your main branch triggers the same sequence of steps in the same environment: no surprises, no human error.
In this tutorial, you’ll set up a production-ready CI/CD pipeline for a Meteor app using GitHub Actions and deploy it to Galaxy, Meteor’s official hosting platform. By the end, every push to your main branch will automatically trigger a build and deploy your app to Galaxy without you touching a terminal.
Here’s what the final pipeline looks like:
Push to main → GitHub Actions triggered → Install Meteor → Inject secrets → Deploy to Galaxy

Note: The commands in this tutorial are written for Linux and macOS terminals. Windows users can use Git Bash or WSL to follow along.
Before we get into the setup, a quick note on Galaxy plans: Galaxy’s free tier spins down your container when it’s not in use, which makes it unsuitable for production apps. For a persistent production deployment, you’ll need a paid plan. The pipeline setup is identical regardless of the plan; the only difference is the container behavior.
Who This Article Is For
This tutorial is for developers who already have a Meteor app running locally but haven’t automated their deployments yet. You don’t need prior experience with GitHub Actions or CI/CD — every step is covered from scratch.
You’ll get the most out of this article if you’re deploying manually and want to stop doing that, or if you’re setting up a new Meteor app and want to do it right from the start.
If you’re brand new to Meteor itself, start with the official Meteor tutorial and come back when your app is running locally.
What You’re Building
You’ll build an end-to-end CI/CD pipeline that does the following every time you push to main:
- GitHub pulls your latest code from the repository
- Meteor and project dependencies are installed
- Your app authenticates with Galaxy using a stored session token
- Your app settings are injected securely from GitHub Secrets
- Your app is deployed to Galaxy
The pipeline is intentionally minimal so you can understand each moving part clearly. The Production Tips section at the end of this article covers how to extend it with testing and multi-environment workflows once you have the basics working.
Prerequisites
Before following this tutorial, make sure you have the following in place:
- Meteor CLI installed locally — required to run and deploy your app. If you don’t have it installed, follow the official Meteor installation guide.
- A working Meteor app — your app should run locally with
meteor runwithout errors. If you don’t have one, you can create a basic app with:meteor create <your-app-name> - Basic Git knowledge — you should be comfortable committing and pushing to a branch on GitHub.
- A GitHub repository — your code should be pushed to GitHub before following this tutorial.
- A Galaxy account — sign up at galaxycloud.app. You’ll need a paid plan for persistent production deployments. Galaxy’s free tier is suitable for following along with this tutorial but will spin down your container when inactive.
- A MongoDB database — you’ll need a MongoDB connection string ready before deploying. You can use any MongoDB provider of your choice. Galaxy also offers a managed MongoDB database, available on paid plans, which you can set up directly from your Galaxy dashboard.
Prepare Your Project
Before setting up the pipeline, make sure your project is ready for deployment.
Confirm the app runs locally
Run your app locally and make sure it starts without errors:
meteor runOpen http://localhost:3000 in your browser and confirm the app loads correctly. Do not move forward if the app has errors at this stage fix them first. A broken app will produce a broken deployment.
Lock your Meteor version
Meteor stores the version of the framework your app uses in .meteor/release. This file should always be committed to your repository so that CI and your local environment use the exact same Meteor version.
Confirm the file exists and contains a version:
cat .meteor/releaseYou should see something like:
If this file is committed in your repository, you are good to go.
Push your code to GitHub
If you haven’t already pushed your project to GitHub, run the following:
git init
git add .
git commit -m "initial commit"
git branch -M main
git remote add origin https://github.com/<your-username>/<your-repo-name>.git
git push -u origin main<your-username> and <your-repo-name> with your actual GitHub username and repository name.
Create Deployment Credentials
To deploy from GitHub Actions, Galaxy needs to verify your identity. The way this works is by using your Meteor session token — the same token that gets created when you run meteor login on your local machine.
You’ll generate this token locally, encode it, and store it as a GitHub secret so the pipeline can use it securely during deployment.
Log in to your Meteor account
Run the following command and enter the username and password you use to log in to Galaxy when prompted:
meteor loginYou should see:
Logged in as <your-username>. Thanks for being a Meteor developer!Note: If you signed up for Galaxy using Google, you will need to set a password for your account before you can use meteor login. Go to your account settings on galaxycloud.app, set a password, then come back and run this command.
Locate your session file
After logging in, Meteor stores your session in a file called .meteorsession in your home directory. This file contains the token that Galaxy uses to authenticate your deployments.
Confirm the file exists by running:
cat ~/.meteorsessionYou should see a JSON object containing your session token.
Encode the session file
Encode the session file to base64 so it can be safely stored as a GitHub secret:
base64 ~/.meteorsessionCopy the output — you will need it in the next section.
Important: Never share your session token or commit it to your repository. Anyone with this token can deploy to your Galaxy account on your behalf.
Add GitHub Secrets
GitHub Secrets allow you to store sensitive information like tokens and credentials securely. The pipeline will use these secrets during deployment without exposing them in your code or logs.
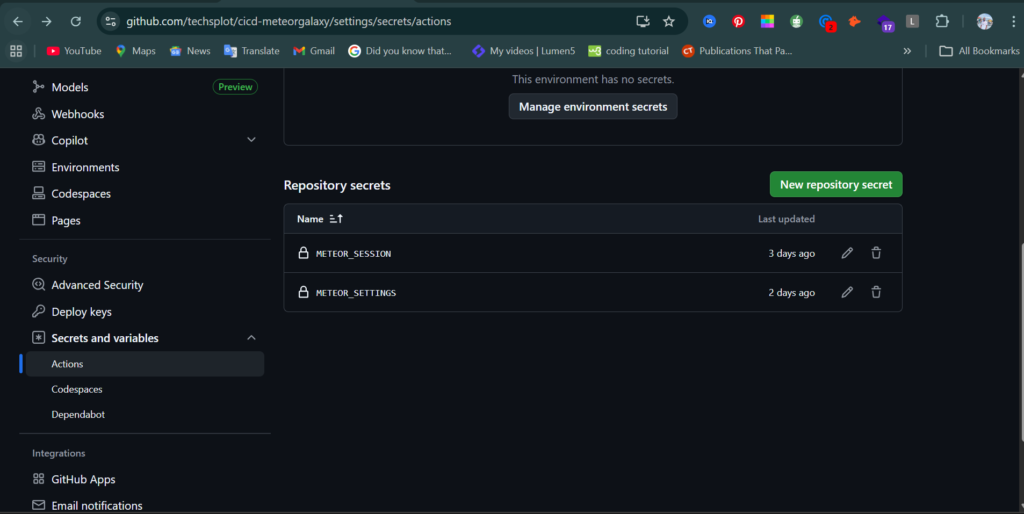
You’ll need to add two secrets:
METEOR_SESSION— the encoded session token from the previous sectionMETEOR_SETTINGS— your app’s deployment settings
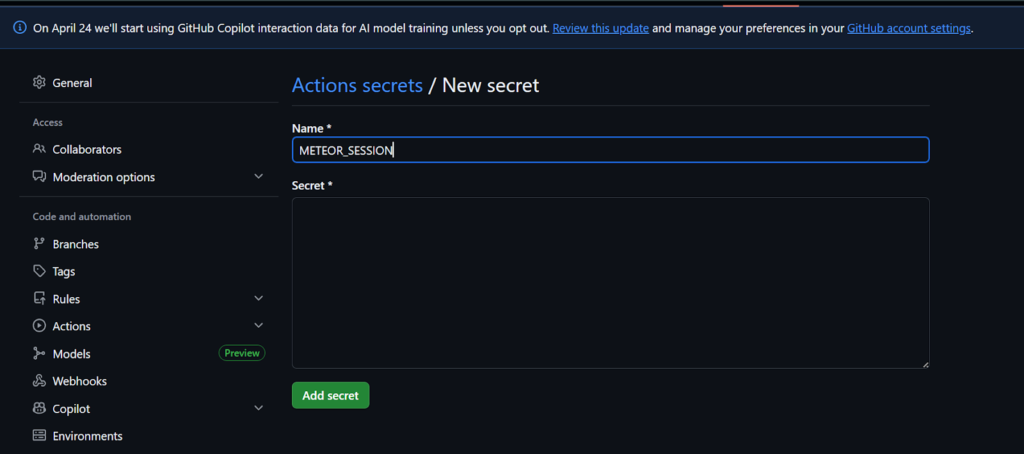
To add a secret, go to your GitHub repository and click Settings → Secrets and variables → Actions → New repository secret.

Add your Meteor session token
- Name:
METEOR_SESSION - Value: paste the base64 encoded output from the previous section
Click Add secret.
Add your app settings
Your app settings contain sensitive information like your MONGO_URL. You’ll store these settings as a GitHub secret, and the pipeline will create the settings.json file automatically at deploy time, meaning this file never needs to exist in your repository or on your local machine.
Before filling in the settings, decide on the name you want your app to have on Galaxy. This name will determine your app’s public URL:
- If you are on the free plan, your URL must end with
.meteorapp.com, for example `my-app.meteorapp.com` - If you are on a paid plan, you can use any custom domain you own
Prepare the following JSON and fill in your actual values:
{
  "public": {},
  "galaxy.meteor.com": {
    "env": {
      "MONGO_URL": "your-mongodb-connection-string",
      "ROOT_URL": "https://your-app-url"
    }
  }
}Replace your-mongodb-connection-string with your actual MongoDB connection string and your-app-url with the URL you decided on above.
Then add it as a GitHub secret:
- Name:
METEOR_SETTINGS - Value: paste the entire JSON above with your actual values filled in
Click Add secret.
Important: Never commit your
settings.jsonfile to your repository. It contains sensitive credentials that should only ever exist in GitHub Secrets.
Create the GitHub Actions Workflow
The workflow file is what tells GitHub Actions what to do every time you push to main. It defines the sequence of steps that install Meteor, inject your secrets, and deploy your app to Galaxy.
All commands in this section should be run from inside your project folder.
Create the workflow file
GitHub Actions looks for workflow files in a .github/workflows directory at the root of your repository. Create this directory and the workflow file by running:
mkdir -p .github/workflows
touch .github/workflows/deploy.ymlAdd the workflow configuration
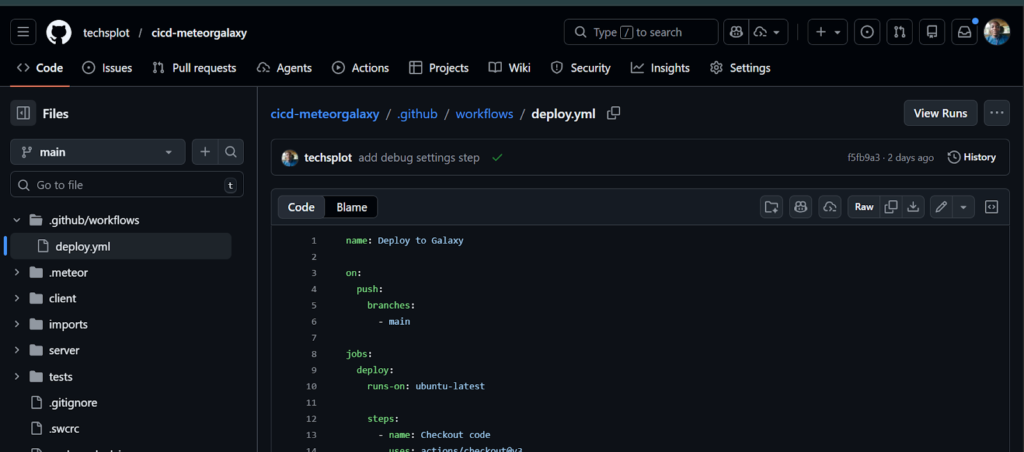
Open .github/workflows/deploy.yml and paste the following:
name: Deploy to Galaxy
on:
  push:
    branches:
      - main
jobs:
  deploy:
    runs-on: ubuntu-latest
    steps:
      - name: Checkout code
        uses: actions/checkout@v3
      - name: Install Meteor
        run: |
          curl https://install.meteor.com/ -o install_meteor.sh
          sh install_meteor.sh
      - name: Add Meteor to PATH
        run: echo "$HOME/.meteor" >> $GITHUB_PATH
      - name: Install dependencies
        run: meteor npm install
      - name: Restore Meteor session
        run: |
          echo "${{ secrets.METEOR_SESSION }}" | base64 --decode > ~/.meteorsession
      - name: Write settings
        run: echo '${{ secrets.METEOR_SETTINGS }}' > settings.json
      - name: Deploy to Galaxy
run: meteor deploy <your-app-url> --settings settings.jsonReplace <your-app-url> with the same URL you used for ROOT_URL in the previous section, for example my-app.meteorapp.com.
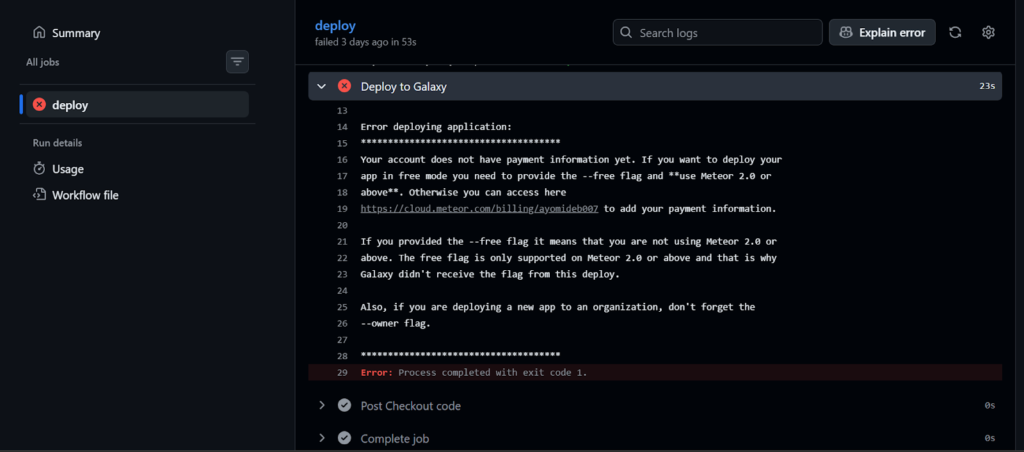
Note: If you are on Galaxy’s free plan, add the
--freeflag to the deploy command.
run: meteor deploy <your-app-url> --settings settings.json --freeUnderstand what each step does
- Checkout code — pulls your latest code from the repository
- Install Meteor — installs the Meteor CLI on the GitHub Actions runner
- Add Meteor to PATH — makes the
meteorcommand available to subsequent steps - Install dependencies — installs your project’s npm dependencies
- Restore Meteor session — decodes your session token and writes it to
~/.meteorsessionso Galaxy can authenticate the deployment - Write settings — creates the
settings.jsonfile from yourMETEOR_SETTINGSsecret - Deploy to Galaxy — runs the deploy command and ships your app
Commit and push the workflow file
git add .
git commit -m "add github actions deployment workflow"
git push origin mainPushing this commit will immediately trigger the workflow for the first time. Head to the Actions tab in your GitHub repository to watch it run.
Monitor the Pipeline
Once you push your workflow file to main, GitHub Actions triggers the deployment automatically. Here is how to watch it and understand what you are seeing.
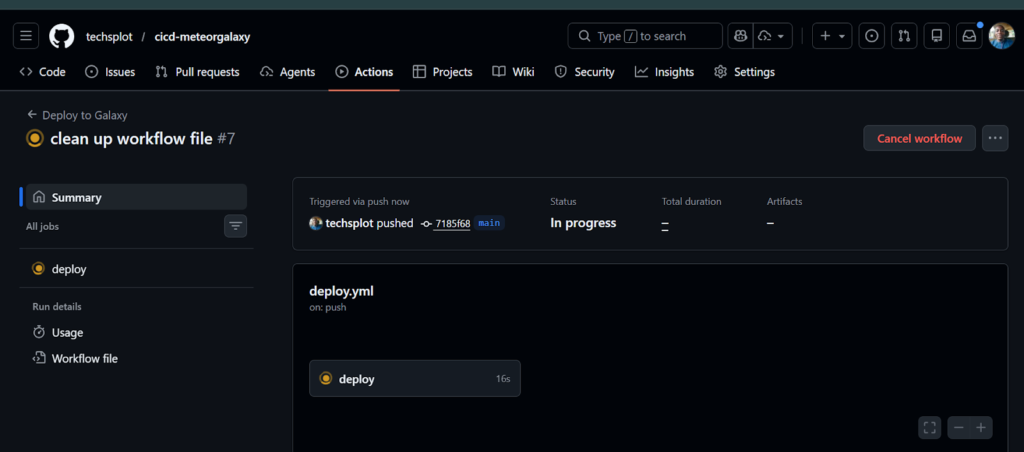
Go to the Actions tab
Open your GitHub repository and click the Actions tab. You will see your workflow listed there. Click on the latest run to open it.

Monitor the workflow steps
Click on the deploy job to expand it and see each step running in real time. You will see the steps execute in order — installing Meteor takes the longest, usually between three to five minutes.
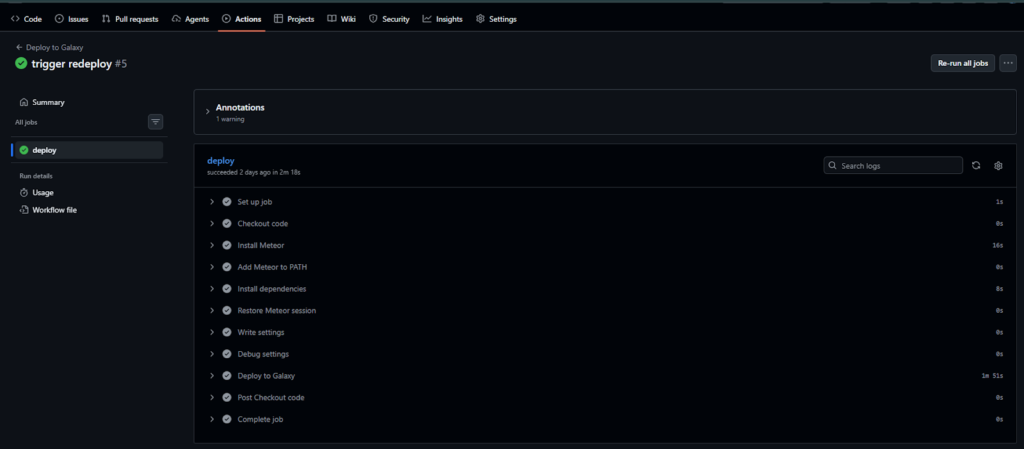
Here is what a successful run looks like for each step:
- Checkout code — completes in seconds
- Install Meteor — takes three to five minutes
- Add Meteor to PATH — completes in seconds
- Install dependencies — takes one to two minutes depending on your project
- Restore Meteor session — completes in seconds
- Write settings — completes in seconds
- Deploy to Galaxy — takes two to five minutes
Understand the logs
Each step produces logs you can expand and read. If a step fails, the log will show you the exact error. Common things to look out for:
- A red cross next to a step means it failed click it to see the error
- If Restore Meteor session fails, your
METEOR_SESSIONsecret is likely incorrect - If Deploy to Galaxy fails, check that your
METEOR_SETTINGSsecret contains valid JSON with the correctMONGO_URL
How the Deployment Step Works
When the deploy step runs, it does more than just upload your code. Understanding what happens under the hood will help you debug issues and make informed decisions when extending the pipeline.
Here is what happens when meteor deploy runs in the pipeline:
Meteor builds your app
Before anything is uploaded, Meteor compiles your entire application into a production bundle. This includes transpiling your JavaScript, bundling your client-side assets, and packaging your server-side code. The result is a self-contained archive ready to run on Galaxy’s infrastructure.
Meteor authenticates with Galaxy
Meteor reads the session token from ~/.meteorsession the file the pipeline wrote in the Restore Meteor session step. Galaxy uses this token to verify your identity and confirm you have permission to deploy to the target app.
The bundle is uploaded to Galaxy
Once authentication passes, Meteor uploads the production bundle to Galaxy’s servers. Galaxy then builds a Docker image from your bundle and runs it in a container.
Galaxy starts your app
Galaxy starts the container, injects the environment variables from your settings.json — including your MONGO_URL and ROOT_URL and routes traffic to your app.
This is why no server setup is required on your end. Galaxy handles the infrastructure — you only need to provide the code and the settings.
Note: The first deployment takes longer than subsequent ones because Galaxy has to build the Docker image from scratch. Later deployments are faster because Galaxy caches parts of the build.
Verify the Deployment
Once the pipeline completes successfully, your app should be live on Galaxy. Here is how to confirm everything is working correctly.
Check your app status on Galaxy
Go to galaxycloud.app and open your app from the dashboard. The app status should show as Running.
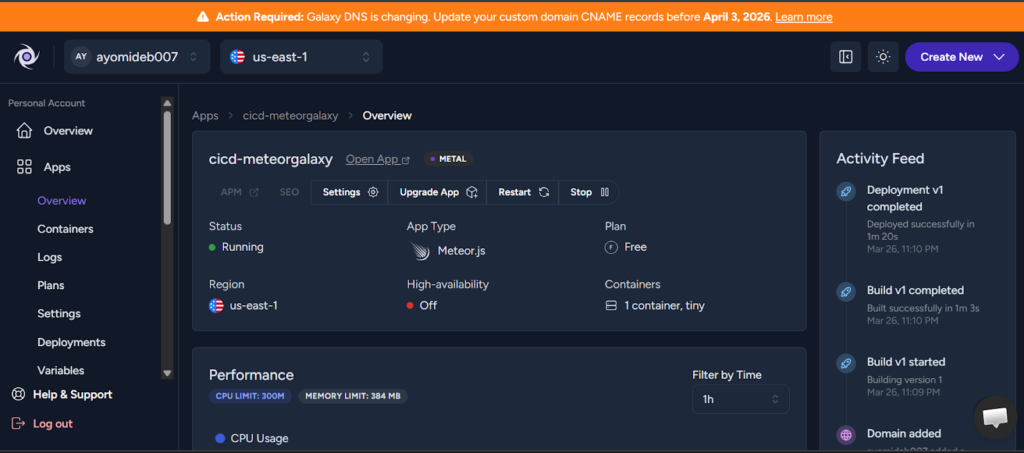
If the status shows Failed or Stopped, go to the Logs tab in your Galaxy dashboard and check the error output. The most common causes are a missing or incorrect MONGO_URL and an incorrect ROOT_URL.
Open your app in the browser
Navigate to the URL you set as your ROOT_URL in the previous section. Your app should load correctly.
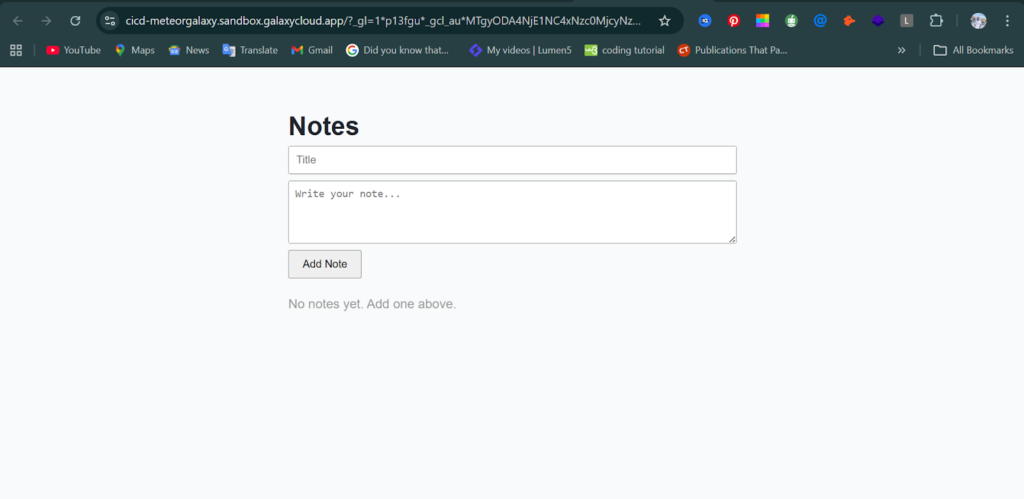
If you see a 503 Service Unavailable error, your container is still starting up. Wait a minute and refresh the page.
If you see a 404 Not Found error, the app name in your deploy command does not match the URL you are trying to access. Make sure the URL in your deploy.yml and your ROOT_URL in METEOR_SETTINGS are identical.
Confirm the pipeline is working end-to-end.
Make a small change to your app, for example, update a line of text, commit, and push it to main:
git add .
git commit -m "test deployment pipeline"
git push origin mainGo back to the Actions tab and confirm a new workflow run was triggered. Once it completes, refresh your app in the browser and confirm the change is live.
If the change appears in the browser, your CI/CD pipeline is fully working end to end.
Common Issues
Even with a correctly configured pipeline, things can go wrong. Here are the most common issues you may run into and how to fix them.
Authentication errors
If the Restore Meteor session step fails with an authentication error, it usually means one of the following:
- Your
METEOR_SESSIONsecret is incorrect or expired. Log in again locally withmeteor login, re-encode the session file withbase64 ~/.meteorsession, and update the secret in GitHub. - Your Meteor account password changed after you generated the session token. Run
meteor loginagain to generate a fresh token.
Missing or incorrect secrets
If the Deploy to Galaxy step fails with an access denied or missing settings error, check the following:
- Make sure both
METEOR_SESSIONandMETEOR_SETTINGSare added to your repository secrets and are spelled exactly as they appear in your workflow file secret names are case sensitive. - Make sure your
METEOR_SETTINGSsecret contains valid JSON. An extra comma, a missing bracket, or an unescaped character will cause the deployment to fail. You can validate your JSON at jsonlint.com before saving it as a secret.
Build failures
If the Install Meteor or Install dependencies step fails:
- Check that your
.meteor/releasefile is committed to your repository. If it is missing, GitHub Actions will not know which version of Meteor to install. - Make sure your
package.jsonis committed and up to date. Runmeteor npm installlocally and push the updatedpackage-lock.jsonif it changed.
App crashes on startup
If the pipeline completes successfully but your app fails to start on Galaxy:
- Check the Logs tab in your Galaxy dashboard for the startup error.
- The most common cause is an incorrect or unreachable
MONGO_URL. Make sure your MongoDB database is accessible from Galaxy’s servers and that your connection string is correct. - Make sure your
ROOT_URLmatches the URL your app is deployed to. A mismatch can cause the app to crash on startup.
Version mismatches
If your app works locally but fails to build in CI:
- Make sure the Meteor version in
.meteor/releasematches the version you are developing with locally. Runmeteor --versionlocally and compare it with the contents of.meteor/release.
Production Tips
The pipeline we built in this tutorial is a solid foundation, but there are a few things you should do before using it for a real production app.
Pin your Meteor version
Always make sure your .meteor/release file is committed to your repository. This ensures that your local environment, your CI pipeline, and Galaxy all use the exact same version of Meteor. A version mismatch between environments is one of the hardest bugs to track down.
Use separate workflows for staging and production
A single workflow that deploys directly to production on every push to main is risky for a team environment. A safer approach is to maintain two environments:
- A staging environment that deploys automatically on every push to a
developbranch - A production environment that deploys only when you merge into
main
You can achieve this by creating two workflow files in .github/workflows:
.github/workflows/
  deploy-staging.yml    # triggers on push to develop
deploy-production.yml # triggers on push to mainEach workflow deploys to a different Galaxy app with its own MONGO_URL and ROOT_URL.
Keep builds reproducible
- Always commit your
package-lock.jsonfile so thatmeteor npm installinstalls the exact same dependency versions in CI as it does locally. - Avoid using
latesttags or version ranges in yourpackage.jsondependencies. Pin to exact versions where possible.
Avoid leaking sensitive data
- Never commit
settings.jsonto your repository. Add it to.gitignoreand always use GitHub Secrets to manage sensitive values. - Rotate your
METEOR_SESSIONtoken periodically by runningmeteor loginlocally and updating theMETEOR_SESSIONsecret in GitHub. - Review your GitHub Actions logs before sharing them publicly. Even though GitHub masks known secrets, custom values that aren’t stored as secrets will appear in plain text in the logs.
Conclusion
You now have a fully automated CI/CD pipeline that deploys your Meteor app to Galaxy on every push to main. What used to require manual terminal commands and careful coordination is now handled automatically every time, in the same way, without human error.
Here is what you set up:
- A GitHub Actions workflow that installs Meteor, injects your secrets, and deploys to Galaxy
- Secure credential management using GitHub Secrets so sensitive values never touch your repository
- A deployment process that Galaxy handles end to end, with no server configuration required
This pipeline is intentionally minimal so you can understand each moving part. From here, you can extend it in several directions:
- Add a test stage before the deploy step so failing tests block a bad deployment from reaching production
- Set up a staging environment that deploys automatically on every push to a
developbranch - Add Slack or email notifications so your team knows when a deployment succeeds or fails
CI/CD is not a one-time setup it evolves with your app. The pipeline you built today is a foundation, not a ceiling. Source code