
Introduction
If you’ve ever watched your Meteor app update in real time, with a new item appearing instantly without refreshing the page, you’ve seen DDP at work. You just didn’t know it yet.
DDP, or Distributed Data Protocol, is what actually carries your data from the server to the client in real time. Understanding how it works is what helps you send only the data your app actually needs, keeping things fast and your server from doing unnecessary work.
In this article we’ll break down what DDP is, watch it in action in the browser, and walk through practical techniques to optimize your subscriptions so your Meteor app performs well as it grows.
What Is DDP?
DDP stands for Distributed Data Protocol. It was created by the Meteor team to solve one specific problem: how do you keep data on the client in sync with the server in real time, without the client having to constantly ask for updates?
The traditional approach to this problem is polling. The client asks the server every few seconds “has anything changed?” It works, but it’s wasteful. If nothing changed, the request was pointless. If something changed a second after the last poll, the user waits until the next one to see it.
DDP takes a different approach. Instead of the client asking repeatedly, it opens a single persistent connection to the server using WebSockets. Think of it like a phone call that stays open. Both sides can talk at any time without having to dial again. Once that connection is open, the server pushes changes to the client the moment they happen.
DDP messages are simple JSON and come in three types:
- sub — the client telling the server “I want to subscribe to this data”
- added / changed / removed — the server telling the client “here’s new data, something changed, or something was deleted”
- method — the client calling a server-side function
On the server, Meteor.publish defines what data is available to clients. On the client, Meteor.subscribe requests that data. DDP is what carries it between the two. The moment a subscription is created, DDP opens the channel and starts moving data.
Every piece of data your app sends to the client travels through these messages, so the more intentional you are about what you publish, the more efficient your app becomes.
Observing DDP in the Browser
The best way to understand DDP is to see it in action. In this section we’ll set up a simple Meteor + React app, wire up a basic publication and subscription, and watch the live DDP messages in the browser.
Setting up the demo app
meteor create ddp-demo --release 3.4 --prototype
cd ddp-demoThe –release 3.4 flag pins the app to Meteor 3.4 and –prototype creates a minimal setup with just the core Meteor stack and React, without the accounts and security packages that a full app would include. This keeps things simple for our demo.
Once the app is created, remove the autopublish package. Autopublish is a development shortcut that automatically sends all your data to all clients with no publications needed. It’s useful for prototyping but a major security and performance problem in production, and it bypasses the whole pub/sub system we want to learn about.
meteor remove autopublish
Creating the Tasks collection
Create a new file at imports/api/tasks.js:
import { Mongo } from 'meteor/mongo';

export const TasksCollection = new Mongo.Collection('tasks');This defines a MongoDB collection called tasks that both the server and client can reference.
Setting up the publication
Replace the entire contents of server/main.js with the following:
import { Meteor } from "meteor/meteor";
import { TasksCollection } from "/imports/api/tasks";

async function insertTask(text) {
  await TasksCollection.insertAsync({ text, createdAt: new Date() });
}

Meteor.startup(async () => {

  if ((await TasksCollection.find().countAsync()) === 0) {
    await insertTask("Learn what DDP is");
    await insertTask("Set up a Meteor publication");
    await insertTask("Subscribe to data on the client");
    await insertTask("Observe DDP traffic in DevTools");
    await insertTask("Optimize subscriptions with field projections");
  }

  Meteor.publish("tasks", function () {
    return TasksCollection.find();
  });
});Subscribing on the client
Replace the entire contents of imports/ui/App.jsx with the following:
import React, { useState } from "react";
import { useTracker } from "meteor/react-meteor-data";
import { Meteor } from "meteor/meteor";
import { TasksCollection } from "/imports/api/tasks";

export const App = () => {
  const [text, setText] = useState("");
  const tasks = useTracker(() => {
    Meteor.subscribe("tasks");
    return TasksCollection.find({}, { sort: { createdAt: -1 } }).fetch();
  });

  const handleSubmit = async (e) => {
    e.preventDefault();

    if (!text.trim()) return;
       await TasksCollection.insertAsync({ text, createdAt: new Date() });

    setText("");
  };

  return (
    <div style={{ maxWidth: "600px", margin: "40px auto", fontFamily: "sans-serif" }}>
      <h1>DDP Task List</h1>
      <form onSubmit={handleSubmit} style={{ marginBottom: "20px" }}>
        <input
          type="text"
          value={text}
          onChange={(e) => setText(e.target.value)}
          placeholder="Add a new task..."
          style={{ padding: "8px", width: "75%", marginRight: "8px" }}
        />
        <button type="submit" style={{ padding: "8px 16px" }}>Add</button>
      </form>

      <ul style={{ listStyle: "none", padding: 0 }}>
        {tasks.map((task) => (
          <li key={task._id} style={{ padding: "10px", borderBottom: "1px solid #eee" }}>
            {task.text}
          </li>
        ))}
      </ul>
    </div>
  );
};Watching DDP in DevTools
Run the app with meteor run and open http://localhost:3000 in your browser. To observe DDP traffic, open Chrome DevTools (F12 or Ctrl + Shift + I), click the Network tab, and filter by Sockets to see active WebSocket connections.
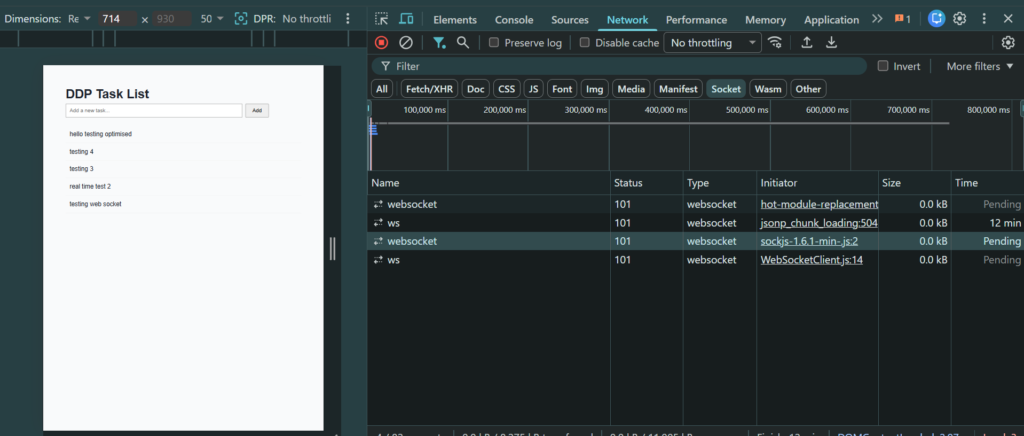
Click on the active connection and go to the Messages tab. Reload the page and watch the messages come in. You’ll see raw DDP messages like this:
{"msg":"added","collection":"tasks","id":"iF4bcS55sgjbRw9kF","fields":{"text":"Learn what DDP is","createdAt":{"$date":1780436405847}}}

{"msg":"ready","subs":["tMbo39vQmpZ762N9j"]}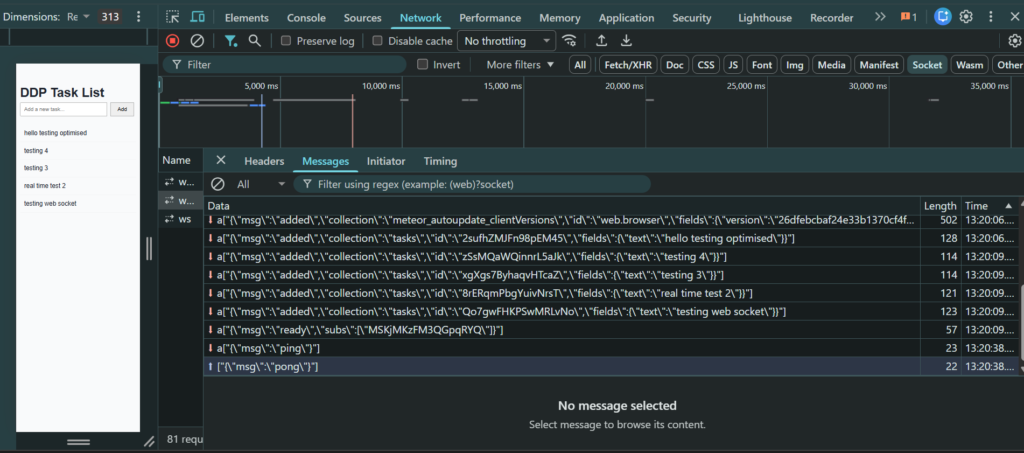
Each added message is the server pushing one task document to the client over the WebSocket connection. The ready message means the server has finished sending all the initial data for that subscription.
Now open a second browser window at the same URL and add a new task. Switch back to the first window and watch the Messages tab. A new added message appears instantly, without any page refresh. That’s DDP delivering the change in real time.
How Publications and Subscriptions Work
Now that you’ve seen DDP messages in the browser, let’s understand what’s actually happening behind the scenes when a publication and subscription connect.
On the server: Meteor.publish
Meteor.publish runs on the server and defines what data is available to clients. Think of it as the server saying “here’s what I’m willing to share.” It takes a name and a function that returns a cursor, which is a query against your MongoDB collection.
Meteor.publish("tasks", function () {
  return TasksCollection.find();
});The name “tasks” is how the client identifies which publication it wants to subscribe to. The function runs every time a client subscribes, and the cursor it returns determines exactly which documents get sent over DDP.
On the client: Meteor.subscribe
Meteor.subscribe runs on the client and requests data from a named publication. When it’s called, DDP sends a sub message to the server with the publication name.
Meteor.subscribe("tasks");In a React component, you’ll typically use useTracker to set up the subscription reactively, meaning it automatically re-runs when data changes:
const tasks = useTracker(() => {
Meteor.subscribe("tasks");
return TasksCollection.find({}, { sort: { createdAt: -1 } }).fetch();
});The full lifecycle
Here’s what happens from the moment a component mounts to the moment data appears on screen:
- Component mounts and Meteor.subscribe(“tasks”) is called
- DDP sends a sub message to the server
- Server receives the sub, runs the publish function, and starts sending matching documents
- Each document arrives as an added DDP message
- Once all initial documents are sent, the server sends a ready message
- From that point on, any change to a matching document triggers a changed or removed message instantly
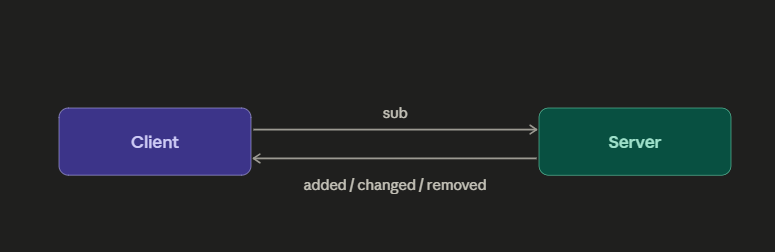
This is why Meteor feels real time. The subscription doesn’t just fetch data once. It keeps the connection open and listens for changes for as long as the component is mounted.
Common Subscription Mistakes
Understanding DDP is one thing, but knowing where things go wrong is what actually helps you write better subscriptions. These are the mistakes that don’t throw errors or break your app. They just make it slower and put unnecessary load on your server.
Over-publishing
Over-publishing is when your publication sends more data than the client actually needs. The most common form is returning all fields of every document:
// Sends everything: text, createdAt, userId, and any other field
Meteor.publish("tasks", function () {
  return TasksCollection.find();
});If your tasks collection has 10 fields but the client only displays 2 of them, you’re sending 8 unnecessary fields over DDP to every connected client, every time something changes. In a collection with sensitive fields like user data, this can also be a security risk.
Subscribing to everything on load
Another common mistake is subscribing to large datasets the moment the app loads, regardless of whether the user needs that data right away:
const tasks = useTracker(() => {
  Meteor.subscribe("tasks"); // sends ALL tasks on every page load
  return TasksCollection.find().fetch();
});If your tasks collection has thousands of records, this floods the client with data it may never use. The user might only ever look at the 10 most recent tasks, but the server dutifully sends all of them over DDP.
Not stopping subscriptions when components unmount
When a React component unmounts, any subscriptions it created should be stopped. If they aren’t, the server keeps tracking changes and pushing DDP messages to a client that no longer needs them.
This happens when subscriptions are set up manually without proper cleanup:
// BAD: subscription never stops when component unmounts
useEffect(() => {
  Meteor.subscribe("tasks");
}, []);The server has no way of knowing the component is gone. It keeps doing work, tracking changes, preparing messages, and pushing data, all of it wasted.
Ignoring what gets sent on the wire
Many Meteor developers write publications without ever checking what’s actually being sent over DDP. Opening DevTools and looking at the Messages tab takes less than a minute, but most developers never do it. If you don’t know what’s going over the wire, you can’t optimize it.
The raw DDP messages you saw in the previous section tell you exactly what fields are being sent and how much data each message carries. That information is your starting point for any optimization.
Optimization Techniques
Good subscriptions don’t happen by accident. Here are the techniques that give you direct control over what DDP sends and when it stops sending.
1. Use field projections to limit what gets published
A field projection tells the publication exactly which fields to include in the documents it sends. Instead of sending everything, you send only what the client needs.
Meteor.publish("tasks", async function () {
   return await TasksCollection.findAsync({}, { fields: { text: 1 } });
}The second argument to find() is the options object. fields is where you define your projection. 1 means include this field, 0 means exclude it. The _id field is always included automatically.
This publication sends only the text field of each task. If your collection has a createdAt, userId, or any other field, none of it goes over DDP unless you explicitly include it.
The difference is visible in the raw DDP messages. Before the projection:
{"msg":"added","collection":"tasks","id":"xgXgs7ByhaqvHTcaZ","fields":{"text":"testing 3","createdAt":{"$date":1780482295537}}}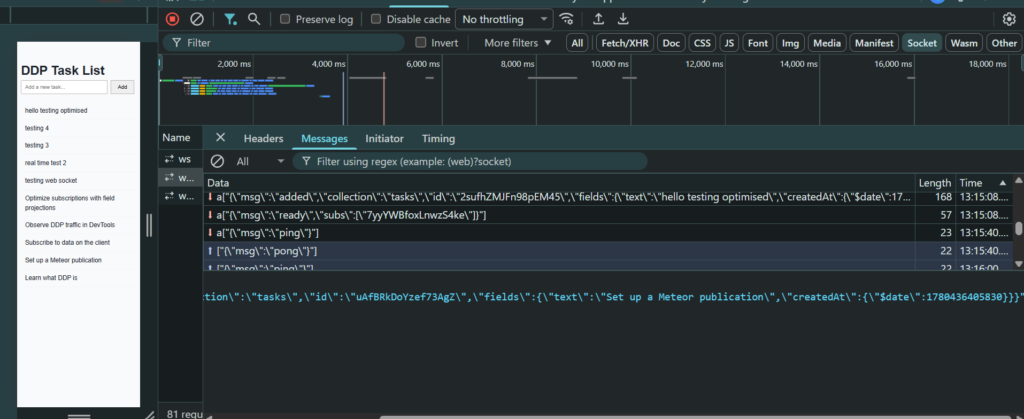
After adding the projection:
{"msg":"added","collection":"tasks","id":"2sufhZMJFn98pEM45","fields":{"text":"hello testing optimised"}}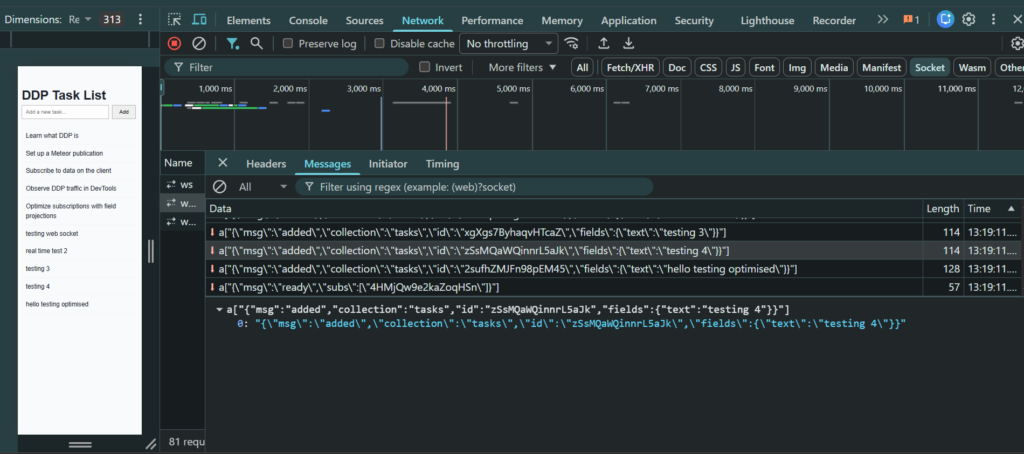
The createdAt field is gone. The message is smaller, and that difference multiplies across every document and every connected client.
2. Limit the number of records
Instead of sending all documents, use limit to cap how many get sent:
Meteor.publish("tasks", function () {
  return TasksCollection.find({}, {
    fields: { text: 1 },
    limit: 20,
    sort: { createdAt: -1 }
  });
});This sends only the 20 most recent tasks. In a collection with thousands of records, this is the difference between a fast initial load and a slow one.
In production, you’d pair this with pagination. As the user scrolls or clicks “load more”, you increase the limit or fetch the next page. That way the client only ever has the data it’s actively using.
3. Scope data per user with this.userId
In most real apps, users should only see their own data. Use this.userId inside the publish function to filter documents by the currently logged-in user:
Meteor.publish("tasks", function () {

  if (!this.userId) {
    return this.ready();
  }

  return TasksCollection.find(
    { userId: this.userId },
    {
      fields: { text: 1 },
      limit: 20,
      sort: { createdAt: -1 }
    }
  );
});Two things are happening here. First, if there’s no logged-in user, this.ready() is returned immediately, sending nothing. This prevents unauthenticated clients from receiving any data at all.
Second, the query filter { userId: this.userId } ensures only tasks belonging to the current user are published. Every other user’s tasks stay on the server. Because DDP maintains this filter for the lifetime of the subscription, real-time updates only reach the users they belong to. User A’s new task never appears in User B’s feed.
4. Stop subscriptions when components unmount
If you’re using useTracker, Meteor handles cleanup automatically. The subscription stops when the component unmounts. But if you’re using useEffect to subscribe manually, you need to stop it yourself:
// GOOD: subscription stops when component unmounts
useEffect(() => {
  const subscription = Meteor.subscribe("tasks");
  return () => subscription.stop();
}, []);The function returned from useEffect is the cleanup function. React calls it when the component unmounts, which stops the subscription and tells the server to stop tracking changes for that client.
This matters at scale. If users navigate around your app and subscriptions are never stopped, the server accumulates open subscriptions over time. Each one tracks changes and pushes DDP messages that nobody is receiving.
5. Use publishComposite for relational data
When your data has relationships, for example tasks that reference users, a regular publication can only return one collection at a time. The naive solution is to publish all users alongside all tasks, but that sends far more data than you need.
publishComposite solves this by letting you publish related data together, scoped to only what’s actually referenced. Install it first:
meteor add reywood:publish-compositeThen use it to publish tasks alongside only the users who created them:
Meteor.publishComposite("tasksWithUsers", {

  find() {
    return TasksCollection.find(
      { userId: this.userId },
      { fields: { text: 1, userId: 1 }, limit: 20 }
    );
  },

  children: [
    {
      find(task) {
        return Meteor.users.find(
          { _id: task.userId },
          { fields: { username: 1 } }
        );
      }
    }
  ]
});Instead of sending all users, this publication sends only the specific users referenced by the published tasks. The DDP traffic stays lean even as your user base grows.
Before and After
The best way to measure the impact of your optimizations is to go back to DevTools and compare what’s happening on the wire before and after.
You already saw this in action in the previous section. The field projection alone removed the createdAt field from every added message, making each one smaller. The limit reduced the number of added messages on initial load from however many are in the collection down to exactly 20.
Those two changes together mean less data leaving your server, faster initial loads for your clients, and a server that isn’t pushing unnecessary updates to every connected client on every change.
The habit to build is simple. After writing any publication, open DevTools, filter by Sockets, and look at the Messages tab. Check what fields are coming through and how many documents are being sent. If you see fields the client doesn’t use, add a projection. If you see hundreds of added messages on load, add a limit.
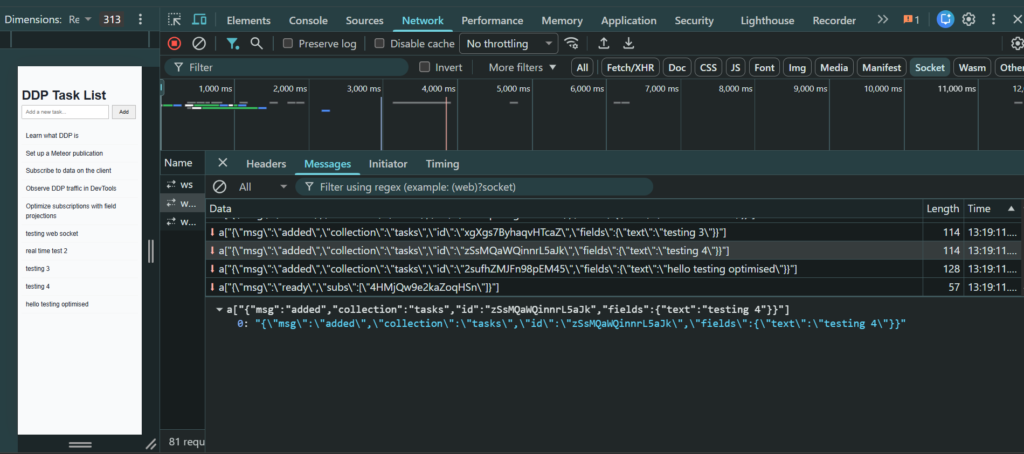
Good DDP traffic looks like lean messages with only the fields you need, and a ready message that comes quickly after a small number of added messages.
Conclusion
You’ve now seen DDP from both sides. What it looks like when it’s working, and what it costs when it’s working harder than it needs to.
Real-time doesn’t have to mean reckless. The techniques in this article give you direct control over what goes over that connection:
- Field projections ensure only the data the client needs leaves the server
- Record limits prevent your server from dumping entire collections on every subscriber
- User scoping ensures each client only receives data it’s supposed to see
- Stopping subscriptions cleanly prevents your server from doing work for clients that have moved on
- publishComposite keeps relational data lean without over-fetching
The best place to start is DevTools. Open the Messages tab on your next publication, look at what’s actually going over the wire, and ask yourself: does the client need all of this? More often than not, the answer is no.
If you’re ready to take your Meteor app further, the Meteor documentation and Galaxy are great next steps, whether you’re optimizing an existing app or deploying for the first time.