
In this post, we will use Ace (a command-line framework) to build a simple Bookmarks CLI app and bundle it into a standalone executable using Bun.
We will learn how to trigger prompts, display a list of bookmarks as a table, and write programmatic tests for all the commands. The app we are building is just for learning purposes and not to produce a complicated real-world bookmarks application.
About Ace
Ace is a command-line framework for Node.js and Bun, written in TypeScript. It is a batteries-included framework that brings all the needed tooling for creating CLIs using a single package.
Created and maintained by the AdonisJS core team, Ace has been powering the framework’s ecosystem for years—handling everything from scaffolding commands to database migration commands. Over time, it has grown into a reliable standalone framework that you can use in any project, not just AdonisJS.
If you’ve used something like OClif, Ace might feel familiar—but it’s much lighter (about 80% smaller in size) and comes with more features available right out of the box.
Here’s a quick look at what Ace brings:
- Batteries included: Built-in prompts, Logger, tables, spinners, and color utilities.
- Powerful argument parsing: Backed by Yargs, giving you a battle-tested parser with a clean API
- Helpful output: Automatic help screens formatted to the docopt standard.
- Test-friendly design: Trap prompts and assert logger output directly, without mocking
stdoutor writing brittle hacks.
Creating a new project
Let’s start by creating a new ESM project. We’ll write code in TypeScript:
mkdir bookmarks_cli && cd bookmarks_cli
git init && echo "node_modules" > .gitignore
Create a new package.json file and install the needed dependencies:
# Create package.json file
npm init --yes

# Install development dependencies
npm i -D typescript @types/node

# Install Ace
npm i @adonisjs/ace
Next, let’s update the default package.json file with the following contents:
{
  "name": "bookmarks_cli",
  "version": "1.0.0",
  "description":"  ",
  "main": "index.js",
  "scripts": {
  },
  "keywords": [],
  "author":"  ",
  "license": "ISC",
  "type": "module",
  "devDependencies": {
    "@types/node": "^24.5.0",
    "typescript": "^5.9.2"
  },
  "dependencies": {
    "@adonisjs/ace": "^13.4.0"
  }
}
Finally, create a new tsconfig.json file with the following contents.
{
  "compilerOptions": {
    "target": "ESNext",
    "module": "NodeNext",
    "lib": ["ESNext"],
    "isolatedModules": true,
    "esModuleInterop": true,
    "strictNullChecks": true,
    "allowSyntheticDefaultImports": true,
    "forceConsistentCasingInFileNames": true,
    "strictPropertyInitialization": true,
    "experimentalDecorators": true,
    "rewriteRelativeImportExtensions": true,
    "noImplicitAny": true,
    "skipLibCheck": true,
    "types": ["@types/node"]
  }
}NOTE: Ace relies on experimental decorators. Therefore, you must run the TypeScript code using a transpiler that supports it. I will be using tsx throughout this post. You may also use bun (if it is installed).
Creating commands
We will store Ace commands within the commands/ directory. Let’s create the folder and our first file:
mkdir commands
touch commands/bookmark_add.ts
Ace commands are defined as JavaScript classes that extend the BaseCommand class. They must implement the run method, which is invoked when the command is being executed by Ace.
- The
commandNameand CLIdescriptionare defined as static properties. Learn more - The CLI arguments are defined as class properties and must use the
@argsdecorator. Learn more - The CLI logger is available via the
this.loggerproperty. You must use the Logger instead of using theconsole.logmethod.
import { BaseCommand, args } from '@adonisjs/ace'

export default class BookmarkAdd extends BaseCommand {
  static commandName = 'add'
  static description = 'Add a new bookmark'

  @args.string({ description: 'Bookmark title' })
  declare title: string

  @args.string({ description: 'Bookmark URL' })
  declare url: string

  async run() {
      this.logger.info(`Adding bookmark "${this.url}" with title "${this.title}"`)
  }
}
Configuring Ace
Now that we have created our first command. Let’s make an entry point file (within bin/run.ts) and configure Ace to process CLI arguments and execute the available commands.
mkdir bin
touch bin/run.ts
The Kernel class is responsible for wiring everything together and executing commands. Make sure to import the BookmarkAdd command and register it with Ace.
import { Kernel, ListLoader } from "@adonisjs/ace";
import BookmarkAdd from "../commands/bookmark_add.ts";

const kernel = Kernel.create()

/**
 * Using the List loader to register our command
 */
kernel.addLoader(new ListLoader([BookmarkAdd]))

/**
 * Handing over the process to the Ace kernel
 */
await kernel.handle(process.argv.splice(2))
Executing commands
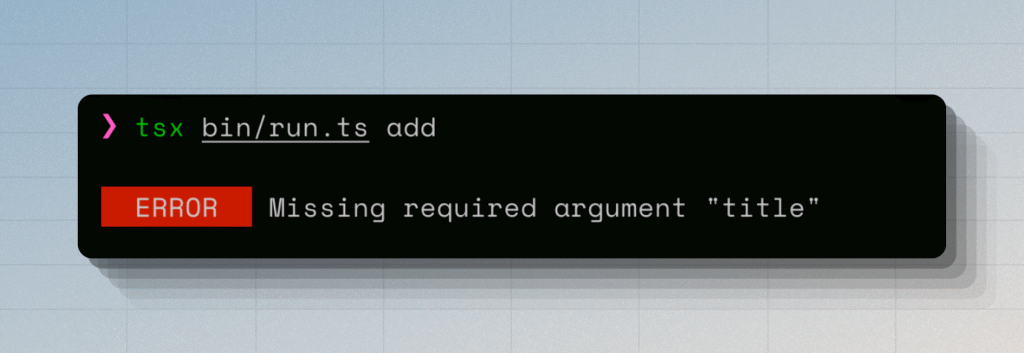
Let’s try executing the bin/run.ts entry point file and run the add command. First, we will try without passing any arguments.
# Using tsx
tsx bin/run.ts add

# Using Bun
bun bin/run.ts add
Since command arguments are required by default, an error will be displayed when running the command without any arguments.
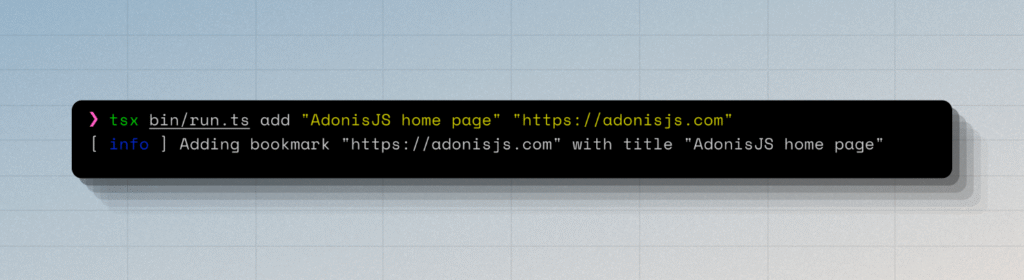
Now, let’s try with a URL and the title.
tsx bin/run.ts add "AdonisJS home page" "https://adonisjs.com"
Creating the help screen
Currently, if you run the entry point file without any arguments, you will see a list of commands powered by the default ListCommands command bundled with Ace.
However, there is no way for us to view the help for a given command. Let’s add this feature using global flags and listeners.
We will listen for the --help flag and display the help screen for a given command. Luckily, we do not have to format or pretty print the information ourselves, as Ace already comes with a HelpCommand that we can import and execute.
The following code will go within the bin/run.ts file before the kernel.handle method call.
/**
 * Register a global --help flag
 */
kernel.defineFlag('help', {
  type: 'boolean',
  description: HelpCommand.description,
})

/**
 * Listen for the presence of --help flag and execute the HelpCommand.
 * Make sure to return the result of `$kernel.shortcircuit()`
 */
kernel.on('help', async (command, $kernel, parsed) => {
  parsed.args.unshift(command.commandName)
  const help = new HelpCommand($kernel, parsed, kernel.ui, kernel.prompt)
  await help.exec()
  return $kernel.shortcircuit()
})
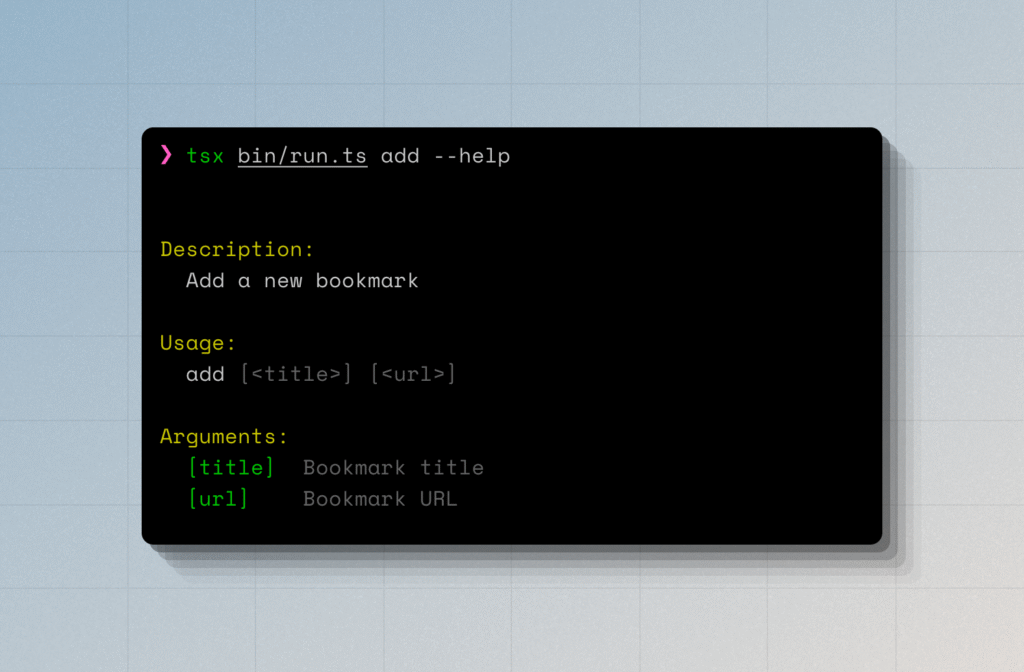
Let’s test our implementation by running the add command with the --help flag. It should display a help screen as shown in the following screenshot.
Building the bookmark:add command
Now that the initial setup is out of our way. Let’s finish the implementation of our add command.
First, we want to make the arguments for the title and the URL to be optional and display prompts if they are not provided. You can replace the contents of the commands/bookmark_add.ts file with the following code snippet.
import { BaseCommand, args } from '@adonisjs/ace'

export default class BookmarkAdd extends BaseCommand {
  static commandName = 'add'
  static description = 'Add a new bookmark'

  @args.string({ description: 'Bookmark title', required: false })
  declare title: string

  @args.string({ description: 'Bookmark URL', required: false })
  declare url: string

  async interact() {
    if (!this.url) {
      this.url = await this.prompt.ask('Enter the URL you want to bookmark', {
        validate: (value) => {
          if (!this.#isValidURL(value)) {
            return 'Enter a valid URL starting with http(s)'
          }
          return !!value
        }
      })
    }

    if (!this.title) {
      this.title = await this.prompt.ask('Give this URL a memorable title', {
        validate: (value) => !!value
      })
    }
  }

  async run() {
    await this.interact()
  }
}
Validating the URL
Let’s update the run method and validate the URL before we persist to our JSON database store.
export default class BookmarkAdd extends BaseCommand {
    // ...existing code

  #validateURL(value: string) {
    try {
      new URL(value)
    } catch {
      throw new Error('Make sure the provided URL is valid and must start with http(s)')
    }
  }

  async run() {
    await this.interact()
    this.#validateURL(this.url)
  }
}
Saving bookmark to a file
Finally, let’s write the code to persist the bookmark to a JSON file on the disk within the computer’s home directory. For this, we will be using the configstore package.
npm i configstore
import Configstore from 'configstore'

export default class BookmarkAdd extends BaseCommand {
    // ...existing code

  async run() {
    await this.interact()
    this.#validateURL(this.url)

    const store = new Configstore('bookmarks-app', { list: [] })

    let list = store.get<{title: string, url: string}[]>('list')
    if (Array.isArray(list)) {
      list.push({ title: this.title, url: this.url })
    } else {
      list = [{ title: this.title, url: this.url }]
    }

    store.set('list', list)
    this.logger.action('Bookmark saved').succeeded()
  }
}
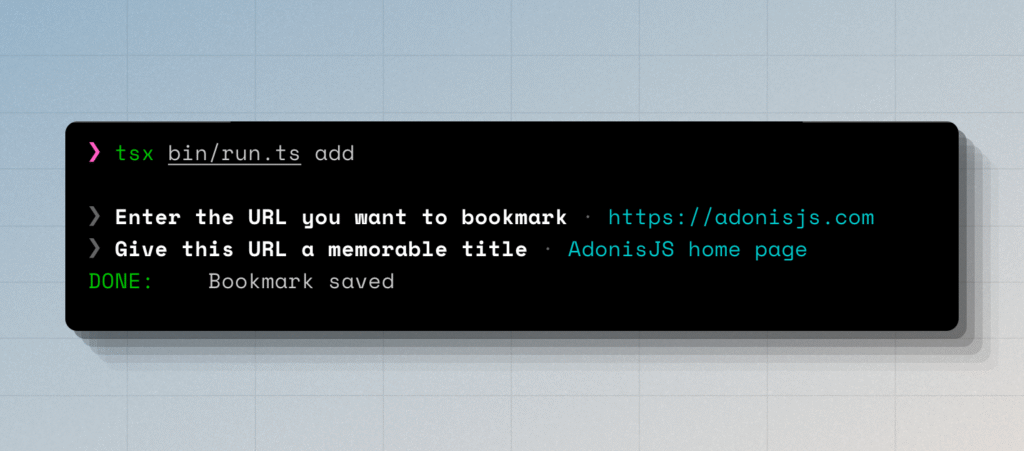
Let’s try creating a new bookmark.
tsx bin/run.ts add
Viewing bookmarks
Now that we have a fully functional add command. Let’s create another one to view the list of saved bookmarks. This time, I will do a speed run and share the final implementation.
WARNING: I have named the command as
viewand notlist. This is because Ace already comes with a list command that displays the list of available commands.
import Configstore from 'configstore'
import { BaseCommand, args } from '@adonisjs/ace'
export default class BookmarkList extends BaseCommand {
static commandName = 'view'
static description = 'View bookmarks list'
async run() {
const store = new Configstore('bookmarks-app', { list: [] })
let list = store.get<{title: string, url: string}[]>('list')
if (!Array.isArray(list)) {
list = []
}
if (!list.length) {
this.logger.info('There are no bookmarks to list. You may want to create one using "add" command')
return
}
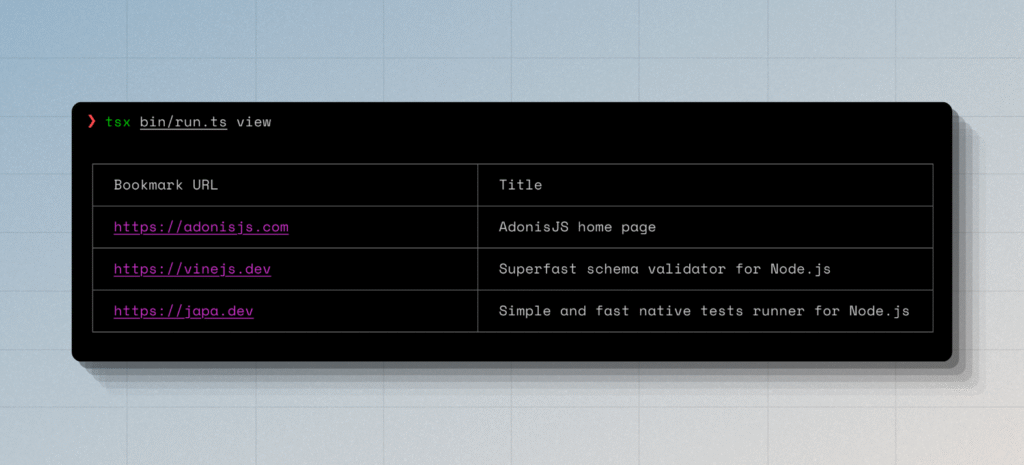
const table = this.ui.table()
table.head(['Bookmark URL', 'Title'])
table.fluidColumnIndex(0).fullWidth()
list.forEach((item) => {
table.row([`${this.colors.magenta().underline(item.url)}`, item.title])
})
table.render()
}
}
Make sure to register the command with Ace.
kernel.addLoader(new ListLoader([
  BookmarkAdd,
  BookmarkList // 👈
]))
Implementing the --no-ansi mode
Many CLI applications offer a unified way to disable or force enable the colourful (also known as ANSI) output. We can implement this using global flags and listeners.
The following code will go inside the bin/run.ts file, before the kernel.handle method.
/**
 * Register a global --ansi flag
 */
kernel.defineFlag('ansi', {
  type: 'boolean',
  showNegatedVariantInHelp: true,
  description: 'Force enable or disable colored output',
})

/**
 * Listen for the presence of --ansi flag and disable/enable the colored
 * output.
 */
kernel.on('ansi', async (_, $kernel, parsed) => {
  if (parsed.flags.ansi === false) {
    $kernel.ui.switchMode('silent')
  }

  if (parsed.flags.ansi === true) {
    $kernel.ui.switchMode('normal')
  }
})
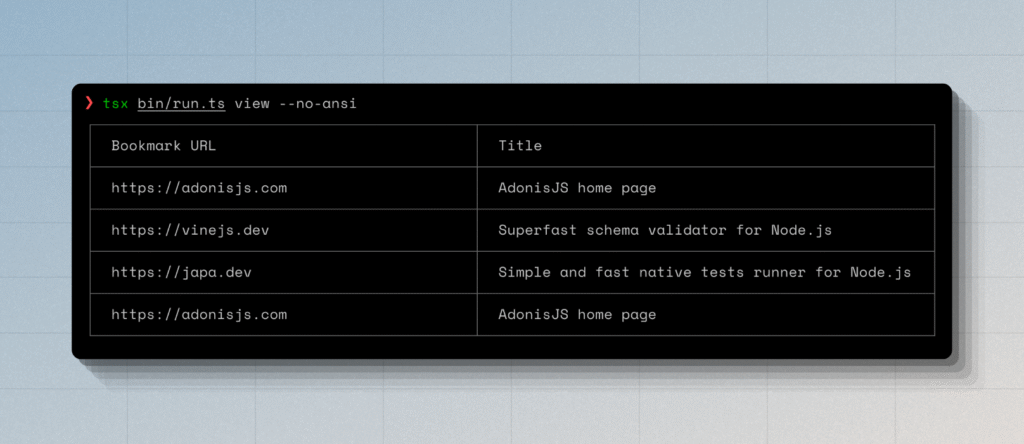
Let’s re-run our commands now using the --no-ansi flag, and we should not see any colours in the output.
tsx bin/run.ts view --no-ansi
Testing commands
Writing programmatic tests for commands is a little tricky because commands offer a user interface and not a programmatic interface. However, the TUI primitives of Ace are built with testing in mind, making it easier to write assertions against the logged output and trap prompts.
For the sake of brevity, I will skip explaining how to write tests using Ace. However, you can check out the source code of the Bookmarks CLI from Github. It also includes tests.
Creating a standalone executable using Bun
Bun is capable of creating standalone executables that can run on computers without Node.js installed, or to distribute proprietary features.
In the following example, we will create the bookmarks executable for your current operating system. Make sure to reference Bun’s documentation to view all the available options.
bun build bin/run.ts --compile --minify --outfile bookmarks
Once done, you can use the CLI as follows.
bookmarks add
bookmarks view
Conclusion
In this tutorial, we explored the basics of building a CLI application with Ace, from setting up the project to creating commands, handling arguments, and persisting data locally. While the example was intentionally simple—a bookmarks manager—the same approach can be applied to more complex tooling for your projects.
Ace’s batteries-included design makes it a powerful choice not only within the AdonisJS ecosystem but also for standalone CLI applications in any Node.js or Bun environment. With its strong developer ergonomics, lightweight footprint, and test-friendly design, it’s a great framework to add to your toolbox.
Hosting AdonisJS apps?
If you’re planning to go beyond CLI utilities and build a full AdonisJS application, Galaxy is a great place to host it. It offers simple deployments, built-in MongoDB, Postgres and Redis hosting, and a zero-DevOps setup so you can focus on building instead of managing infrastructure.
Start for free and scale as you need.